We recently had our antique kitchen table refinished. It is a solid walnut so I knew with some work it could be beautiful again.. the table had tons of wear and blemishes with a orangey-reddish, glossy finish.. so it was definetely time for a much needed update.. Because spare time has been hard to come by these days I hired a company to finish the table for me. Great prices, quality work. And I couldn't be happier with how it turned out! Now it flows perfect with our RH burnt oak chairs and our wooden island pendant lights.. yay!! see all the details below..
Showing posts with label restoration hardware. Show all posts
Showing posts with label restoration hardware. Show all posts
Saturday, March 25, 2017
Saturday, November 15, 2014
Our Dining Room Reveal
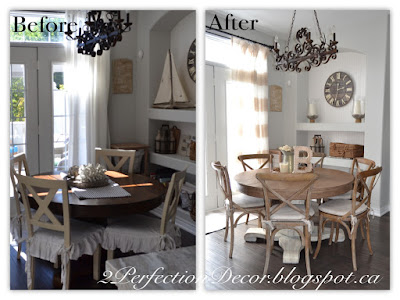
I will be posting Our Christmas Room Reveal's soon.. So I wanted to make sure you got to see the way our home looks on a everyday basis first. Here is our Dining room Reveal. We fell in love with our new house for the backyard, the round arched doorways throughout and the fact that we finally had a separate dining area again! Even though it's our least used room in our house :( ..I'm working on changing that! The above before picture shows what it looked like when we purchased, with the previous owners decorating.. It showed very nicely when we saw it for the first time, it just wasn't our style.. As I have said before in previous posts.. We had professionals refinish all the hardwood flooring to a dark 'Ebony' tone. We actually didn't paint the walls in here, just added lots of our painted furniture for a softer, lighter look. To make the room appear bigger we switched the table direction to come out from the window. And changed out the old chandelier and all the window hardware and curtains to new, natural linen light weight curtains with white cotton sheers underneath. See more below.
In the corner of our dining room we have a mini bar cart set up. It is a metal stand with a marble top. It features a silver tray and a mix of empty vintage decanters and a glass ice bucket which I got from Homesense a few years ago. I'm not a true drinker.. so I always get flack for the decanters being EMPTY! For me it's just for looks ;)
On either side of the window we hung 2 Antique architectural drawings, framed in simple black Ikea Ribba Frames
Our Current Centrepiece is a wooden box filled with dried hydrangeas and vanilla scented candles. My favourite vanilla candles are the pillar ones from Ikea. Here I used two Hurricane glass vases to hold the ivory coloured candles. And for a little added french flair I wrapped the outside of the candles in a black striped jute webbing.
Our Dining hutch provides tons of much needed storage and display space.. currently it holds my granny's dishware set.. I just love the simple floral detail around the edge of the dishes.
I need all the display space I can get.. So I used the top of our hutch to display a few decor items.. A neutral vignette made up of Hydrangeas in a burlap wrapped vase, a wooden bunny and a white soup tureen. With a empty weathered chicken wire garden terrarium on the right side.
Our Dining hutch was a Kijiji online find for only $75.. I absolutely love the metal grill detail over the glass. It was originally a darker wood, So to make it more my style I painted it Benjamin Moore Natural Linen and changed out the hardware.
See the full transformation here.
We have 3 different types chairs in this space. I know it sounds like a lot of chairs for one room but because of the material and the colouring of them, they all play nicely together. The head chair's are made from a linen fabric with large metal studs, they were originally used in our previous home's kitchen. They are from Restoration Hardware. The X-back chairs were a Kijiji find that I painted BM Natural Linen to match our hutch and added white linen ruffled slipcovers. You can see the full X-back chair transformation here. Lastly the captain chair's on either side of our hutch are my latest kijiji find!! I fell in love with the french provincial look and the cane back detail .. I will be sharing more info on that amazing transformation coming soon...
Some of our Dining decor... Under one of the shutters I have a Wrought iron urn filled with simple moss balls from Restoration Hardware, displayed with a vintage demijohn jug.
This is our view from our hall into our dining room
Our White dining chandelier wasn't always white.. It used to be gold.. I spray painted it last year. And added the ornate ceiling Medallion for a vintage feel.
Here is Our Dining Chandelier 'Before' when it was Gold.. The white just freshens it up a bit!
See our Previous Dining Room HERE
We hung two wooden clover detail mirrors on either side of our hutch for balance and symmetry. The mirrors were a lucky Homesense find earlier this year.
Our Dining table is a Mahogany Duncan Phyfe style. Ideally I would love a more farm house style table in here, so for now I added this neutral ticking stripe table runner for a more casual look. The runner is from a great Etsy shop.. I make and sew a lot of items myself but when things are reasonable priced as this one was, sometimes it just easier just to purchase. The runner is a Khaki and Natural tone ticking stripe with a natural ruffle.. It just goes perfect with everything!!
Here is the view from our dining room into our Living room.
Full Living Room Reveal coming soon...
See our Dining Room all dressed up for the Holidays HERE
Thanks for looking.. If you liked this you may like our current Kitchen Reveal
Shared With:
Coastal Charm : Show and Share
Life on Lakeshore Drive : A Bouquet of Talent - Featured!
Monday, September 8, 2014
French Country Kitchen Reveal
Our New Home's kitchen is a chefs dream.. Thank god I married a wannabe chef! ITS HUGE! A super open kitchen, breakfast bar and casual dining eating area with a additional bar sink and wine fridge. The cabinets were already a nice Biscuit Cream Coloured Maple. With Traditional in-lay style Cabinet doors with a antique glaze. We lucked out with amazing quality cabinetry BUT it lacked style.. or should I say MY STYLE! So the TO-DO list began...First thing was painting out the dental crown moulding. Then adding a new backsplash throughout, a pot filler (so excited!), a new lighting plan, all new lights and finishing it off with some new hardware. See below for all the transformations..
It had this Mexican style backsplash that didn't seem to go with the rest of the house or kitchen cabinets
This is the open bar area.. we originally covered the backsplash with real beadboard then learned our lesson the hard way and went over it in beadboard wallpaper. When I tell you I love beadboard wall paper I mean it!! See how it changed my daughter's nursery walls here.
Here is the new backsplash. we chose a simple marble subway tile and added a tiled detail above the stove where pot filler was added.
The newly stained floors really stand out here. We opted out of an area rug for this room A) because larger rugs can get so expensive B) Because I like how you can see more of the floor and how open it looks.
One of the first things I did was paint out the darker parts on the dental mouldings,, now some of you may like this look but personally its not for me. I wanted the kitchen to be simple and clean. A fresh farm modern kitchen.. So I painted out every line by hand.. I left the darker detail lines underneath for some character . I really like how it turned out. It brightened up the whole kitchen. Also Shown below of course are my go to knobs.. Crystal Restoration Hardware knobs were a must. 
The chandelier is one from our old kitchen, Its was purchased from Ballard Designs about 6 years ago or so. The granite was already installed. We were Pretty happy with the colour, more orange-y then I would have chosen but not enough to change it. Very livable! ;)
Here is the open bar counter area.. As I said before we installed beadboard wallpaper to create a simple backdrop. As well as to create some distinction from the bar area and the rest of the kitchen.
We also added the addition of the 'EAT' sign over the window. Believe it or not, they are off-white Metal letters from Restoration Hardware Baby.
A pot filler was a luxurious SPLURGE... But it was a MUST HAVE item on my To-do list! I love it and am so happy we decided to get a plumber to run the plumbing over to make it happen. It makes filling water for boiling sooooo much easier.. Plus it looks great!!
The lighting plan change.. It was all wrong before.. it had pot lights above the dining table so we had an electrician close them down and add two new electrical boxes so we could have two hurricane pendants lanterns hang above kitchen dining table.
Both the Bar stools and the Chandelier are from our previous home.
Because this house was a lot bigger than our previous house.. We needed to purchase a lot of new items. Two of them being a large kitchen table to fill up the space and all new chairs.. We decided to go with a harvest style table.. We chose the Sanctuary Table from Hooker Furniture for our Kitchen Dining Table as it can stretch to be almost 11ft long!
Great for our future family Holiday Dinners.
The Chairs are all new from Restoration Hardware. The two head chairs are the Nailhead Upholstered Armchair upholstered in a neutral colour, Sand Belgian Linen. The six X-back chairs are the Madeleine Side Chair in Burnt Oak wood colour with the Sand Belgian linen seat cushions.
Our desk area turned out to be a great spot for organizing and using the computer. Love how the desk drawer holds all our miscellaneous things.. a.k.a The junk drawer!!
The Zinc and Glass Vintage-look Pharmacy Canisters were a lucky clearance find online at Restoration hardware a few years ago.
Thanks for looking.. If you loved this you will love what we did to our Ensuite Bathroom !
See our Previous House Tour Here.
Subscribe to:
Posts (Atom)


