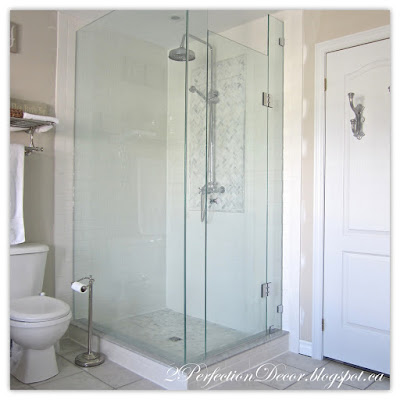
Yay!! We finally reno'd our shower!!! Since we purchased this house a little over 2 years ago.. I have been itching to install a new shower. First because the shower was dated and not to my taste and secondly, it was getting older with grout cracks and a peeling, cracked ceiling. And soon enough we would find we had a LEAK too!! A while back I replaced all the old disgusting grout and realized at that time we were really getting down on the lifespan left of this 14 year old shower. It was all just a band aid for our looming water leak... One day we were all sitting in the living room when my hubby looked up and sure enough we had wet water marks all in our ceiling. The timing couldn't of been worse! I had just given birth to our son. In the end the shower turned out exactly how I had always envisioned it.. See all our shower details by clicking below...
I've decided not to bore you with too many construction progress posts and just show one full reveal post.. So here it is. It's the reveal pics that are the most fun anyways!! So lets get to it.. for the main tile materials we went with a classic mix of Carrara marble with a 3x6 white subway tile. Of course I had to splurge a bit, we went with a classic Carrara 2 inch herringbone tile floor and a Carara marble hexagon tile for the feature faucet wall.
Here is our shower when it was all gutted. Let me tell you what a nightmare on timing this was.. our son had just been born and he was approx 2 weeks old when we had our contractor start the demo work :(
Originally I really wanted to include some built in tiled storage shelves for shampoos and soaps BUT unfortunately the one simple subway tile wall is an outer wall and my contractor advised me we couldn't cut into the insulation on that wall. The feature wall was my next option but then the shelves wouldn't be symmetrical.. I was disappointed at first but I needed the shower to be functional as well as pretty... So the new plan is to add 2 metal corner shelves, to hopefully avoid a cluttered shower floor full of products.
Here you can see grout makes all the difference. After much debate we went with Mapei White grout with classic 3x6 white subway tiles from Home Depot. We decided to go with white grout to give the clean look I was going for.. even though I know it will be a little harder for up keep I just love the way it softly blends with the tiles so there are no harsh lines..
The Herringbone Carrara was ordered from a local tile shop but it was available at Home depot as well. It's just that we ended up getting a better deal by buying herringbone wall tile and hexagon floor tile together.
At first we were just going to keep the original shower light.. crazy idea right??? But once we installed new shower faucet they were practically touching so we realized we needed to do something about it.. so in went the new flush shower ceiling light.. What a difference!!! The new shower light really updated everything! I can't believe we were ever going to keep old one?? :)
And here it is all complete.. So happy with the final results.. and so happy to FINALLY be able to have my house back and take showers in my bedroom bath once again ;)


We ended up choosing a rain shower head with chrome vintage inspired hardware.
I found this faucet on EBAY!! I got it for an amazing deal.. It works so great. Its so nice to have a separate wall mounted diffuser, and I just love the vintage style hot and cold taps.
Well there you have it.. More on our other recent Ensuite Bathroom updates to come..
Shared With:


That looks fantastic, Lisa! Love your material choices.
ReplyDelete