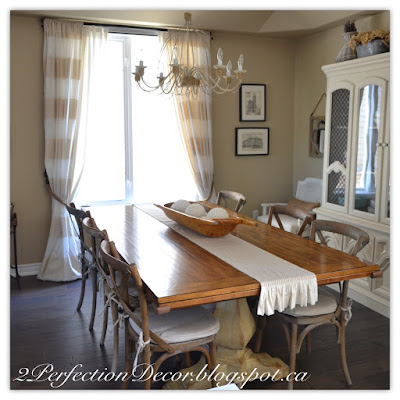
I decided to change up our dining room a bit by adding this cute farmhouse bench from our deck.. with our Canadian winters and snow and space at a limit for outdoor furniture storage... I decided what a better way than to use my little bench instead of just storing it away.. so here is how it all turned out!! ;)
Monday, December 19, 2016
Saturday, December 17, 2016
Christmas Home Tour 2016
I'm here tonight to share our full home tour of our House decorated for the holidays.. I'm going to keep my wording to a minimal.. you can find out more details about each room by clicking individual room links below for further details...
Tuesday, December 13, 2016
Kids Pastel Christmas Tree
I know I get so wrapped up in my decor sometimes it can take a little bit of the fun out of Christmas.. so this year we decided to add another tree specifically for the kids!!.. I wanted the kids to be able to have a 'FUN' tree.. so we got one for the basement, a fitting spot where we have most of the toys and kids love to run around. Come see how it all turns out..
Sunday, December 11, 2016
Christmas in our Kitchen
So with 2 weeks left until Christmas.. I thought I'd share how I added some Holiday cheer to our kitchen & Breakfast area.. the most used and abused room in our house! Well it was all about simple items that wouldn't get in our way or that you can tire of too quickly... Come see our easy, neutral Christmas kitchen additions ...
Saturday, December 3, 2016
Holiday Foyer & Halls 2016
Over the last few weeks I've been sharing a few of our Christmas room reveals.. Today I'm sharing our entry and main floor hallways.. Natural Materials with touches of red.. come see how it all turns out!
Tuesday, November 29, 2016
Living Room decorated for Christmas
This holiday season I decided to add all the pops of red to the front rooms of our house.. this means our living and dining rooms are bursting with holiday reds.. see how it all turns out below..
Sunday, November 20, 2016
Christmas in our Dining Room 2016
This year I kept the red holiday decor designated to our Dining and Living Rooms as they are connected to each other... The red just sets the mood for the holidays as it's one of the first rooms you see when you walk in our front door. ;) Come and see how it all turns out by clicking read more..
Labels:
2016,
antiques,
boxwood,
centerpeice,
christmas,
crated jug,
dining room,
dough bowl,
fresh magnolia leaves,
holiday decor,
lanterns,
magnolia,
mini wreath,
red and neutral,
tablescape
Thursday, November 17, 2016
Vintage Rustic Christmas in our Family Room
So Christmas is blooming all over our home and on my instagram.. Every season I wrack my brain to come up with a new decor scheme... this year I went with natural woods and burlap mixed with dashes of galvanized metal, silver and white... I just absolutely love decorating for the holidays, and its been extra fun this year with the kids appreciating it more...Check out how it all turned out by clicking 'read more'...
Thursday, November 10, 2016
DIY Laundry / Mudroom Wall Hooks
Here is a way we transformed our blank canvas of a wall in our laundry room into cute wall hook storage.. We were trying to make a mini mudroom in our laundry for extra storage to hang bags and drying hooks for our wet clothes etc... We created this wall hook using left over scraps from various other projects around our house.. The only thing I needed to buy were these 4 hooks from Rona. Read the rest of the details below..
Tuesday, October 25, 2016
Basement Rec Room Reveal
So I've been up to a few furniture changes down in our basement over the past few weeks.. I moved our 2 linen chairs that use to be at our kitchen head table chairs from our previous farmhouse table downstairs.. We currently don't need them upstairs anymore as we are trying out a round table in the kitchen to change things up a bit... We also moved our black and white settee sofa from the guest room downstairs.. We placed the settee right in front of the window, I love the way now I can sit with my feet up while watching and reading with the kids. See how our Rec room turns out by clicking 'Read more' below..
Friday, October 14, 2016
Living Room Updates
Here is what our living room is looking like lately.. So i'll be honest I haven't done too many seasonal updates in here.. more 'overall' updates in this room. Currently it's transitional neutral space between fall.. however it will most likely stay like this until its Christmas decorating time ;) .. You can see all the changes by clicking 'Read more' below..
Tuesday, October 11, 2016
A New Rug for our Living Room
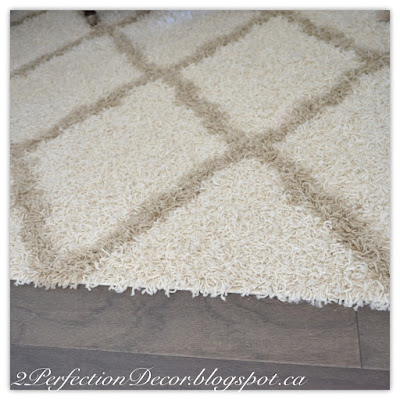
Today I am here to share the latest addition to our living room..our new shag-ish style rug!! We are loving how the overall ivory base colour helped liven up and brighten our room.. The neutral taupe trellis detail was exactly what living room floor was needing ..See all the details by clicking 'Read more'...
Saturday, October 8, 2016
Breakfast Room Reveal
So I'm so excited to share our Breakfast area today.. we've done some changes in here recently.. I found this antique wooden round table at an online auction recently with this really unique base and just had to have it!! I got it for a mere $50 but it does need some work..well a lot of work!! I know.. I know I just recently posted about our farmhouse rectangular kitchen table.. which we just did a makeover on by adding planks to the top of it.. Don't worry I still have it and love it But I couldn't resist this deal .. I should tell you, I have never had a round table before.. but I think I like it??. Then there is the tiny fact that I am super torn on which style I like??.. I really like BOTH ..ahh!! :( So please help me..what do you think? Do you prefer the round or rectangular farmhouse style for our space? leave me your comments below...
Wednesday, October 5, 2016
Simple Fall Entry Decor
Here is just some ways we added Autumn flair to our entryway.
So of course it starts with Fall pillows.. you can never have enough throw pillows or at least that is what I tell myself when I buy another pillow!! :( I continued the pumpkin theme over to the top of our corbel console table. A homemade wooden pumpkin sign points to 3 small pie pumpkins.
See more pics of our entry by clicking 'read more'..
Tuesday, October 4, 2016
Dining Room decorated for Fall
So here you have it.. better late than never .. our Dining Room decorated for Fall and Thanksgiving.
Click below to see all the details and source list...
Monday, October 3, 2016
Our Dining Room lately
Here's a little peek at the way our dining room had been looking lately before I changed it over to fall ;) .. I will be sharing how we decorated it for Fall tomorrow. So I will keep this post short and sweet. Check out all the pictures below..
Wednesday, September 28, 2016
Our Family Room decorated for Fall
So earlier this week I shared what our Family Room had been looking like. Now I am here to share how we have decorated it for Fall. This year it was all about simple fall touches from nature... click below to see more Simple and natural Fall inspired ideas..
Sunday, September 25, 2016
Our Family Room Lately
Just before I show you our family room decorated for Fall later this week I thought I'd share how it has been looking for the last few months.. I was meaning to share this earlier ;(.. It's just been quite a hectic summer... So this year I decided to switch up the colour scheme in our family room just a little bit.. Though I LOVED last years Navy Summer theme.. This year I went with touches of soft aquas with the neutrals you all know I love so much.. See all the details below..
Monday, September 19, 2016
Entry Hall Updates
So we brought the Antique dresser from our hall up to Master bedroom to use as one of our end tables. Bye bye to my childhood end tables :) More on that soon! So for now we are using this sofa table that I got from Target about 10 years ago as our hall table...granted it has gone through a little makeover since then.. Now it's a tad lower than what I am used to, but with the height of the tall mirror and lamp I feel like it all works... I'm using stacked woven storage baskets and demi john underneath as decor.. The baskets actually create storage for all our winter accessories.. Boo winter :( See all our recent changes below..
Thursday, September 15, 2016
Nautical First Birthday Party
So our little guy recently turned 1!! oh my gosh 1!! how the year flew.. well at times it was slooowww!! But overall these last few months at least have flown by!!
So his Nursery is nautical so it was only fitting that his first birthday would be too. I found a ton of great inspirational ideas via pinterest. So I am here to show a few ideas we used and how it all turned out...
So his Nursery is nautical so it was only fitting that his first birthday would be too. I found a ton of great inspirational ideas via pinterest. So I am here to show a few ideas we used and how it all turned out...
Sunday, August 28, 2016
Vintage Burlap bag as Wall Art
I purchased this great Burlap Bag on Etsy. I originally purchased it for our son's nursery.. But I ended up filling his walls with other things.. So I finally decided it was the perfect fit for our Basement... So here is how it all turned out!
Thursday, August 25, 2016
How to create a rustic aged wood look
So this is what you'll need:
Annie Sloan French Linen paint
Annie Sloan Old white paint
Annie Sloan soft wax in Dark and Clear
Rags - old cotton T-shirts work best
Paint brushes
Click to see all the easy how-to steps...
Wednesday, August 24, 2016
Planking our Farmhouse Table Top
More changes to our kitchen.. I've been craving a planked harvest table so I just simply added pine planks to the top of our original oak kitchen table and then stained them the best I could to match our weathered kitchen island pendant lights and RH chair legs... I will post more on the stain tomorrow.. Check out how it all turned out here!
Sunday, August 21, 2016
Medicine Cabinet Makeover
Today I am sharing a small project I have been up to.. I found this medicine cabinet a while back at a ReStore shop by my house for under $10. At the time I 'loved' how it was lavender in colour...It's actually what attracted me to it and made me buy it! I originally got it for my daughters playroom. Now having a son... I am in the midst of trying to make the playroom a little"less feminine".. It's currently bubble gum pink in colour with a baby pink kitchen.. ahh my poor lil' guy lol! Anyways I added some vintage more masculine wall art and decided to move the medicine cabinet up to our master ensuite so I could have even more storage.. Yes I need more storage!! Read below for more details on our easy medicine cabinet makeover.
Thursday, August 11, 2016
Antique Wash Basin Stand into Vanity Makeover
First let me say.. Sorry. I know I have been MIA for a while.. This summer has just been super busy with the kids... So today I am here to share a bit of what we have been up to over here.. One of our recent DIY's is this Antique wash basin stand.. I got it on an online auction for $50! So with a budget of approx. $300 and by mixing up some old with the new I was able to create our new modern farmhouse Vanity.
Wednesday, July 13, 2016
Added another Antique Barn Door
We added yet another barn door to our home ;) We changed up the basic builder door to the basement to this great distressed Antique barn door. Best of all the door was already this great distressed grey so all I had to do for this one was clean it up a bit and add some vintage looking hardware. For us it was the simple change that the basement needed.. Impactful practicality and ART all rolled into one! :)
Thursday, July 7, 2016
Toddler Girl Cottage Chic Bedoom Reveal
As I am posting this I can't help but think of how surreal this all is.. My baby girl is getting so big!!! She's not a baby anymore... She's a full grown toddler!! She's potty trained, goes to school..Oh my gosh she is growing up way too fast! As you can see I've decorated her room very girly :) so I can basically live all my shabby chic dreams through her..well till she wants to cover her walls with boy bands that is... oh the days when I had Backstreet Boys and J.T.T on my walls ;)
Wednesday, June 29, 2016
Updating a Vintage Chandelier
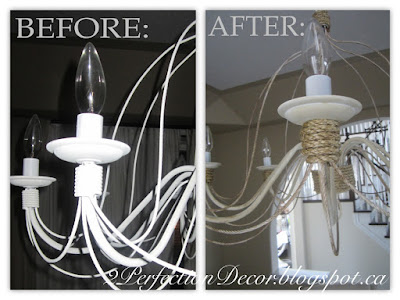
Today i'm sharing how I updated our old chandelier to give it a more Rustic vibe. It's amazing how simply adding sisal rope to the trim of the chandelier can completely change the look and create the natural element I was craving. Now I should tell you that even though this makeover wasn't HARD, It was quite time consuming and I did burn my little fingers more times than I would like to admit. ;) Now keep in mind the rope I used is thicker than the typical in-expensive jute. Which made it was quite a mission to cut! All I did was pre-measure how much I needed per candelabra... And then added the glue to each chandelier arm and wrapped, one arm at a time.. I also tried to start my sisal wrap at the back to make it less visible.
Sunday, June 19, 2016
Florida Vacation Rental...
To celebrate the first official day of summer I decided to share a vacation home we stayed at recently.. This post is basically a ton of beautiful, beachy, shabby chic inspirational pics that I think y'all going to love! I was in pure 'decor heaven' while away ;)
Monday, June 13, 2016
Planked Wood Stair Ceiling
So since we have been on this planking mission over at our house.. We decided to try it one more spot.. now I know I keep mentioning planking... I just love details, mouldings and wainscotting!!! And its a super inexpensive way to transform a basic space. So talk about BASIC. The slanted ceiling above the stairs, basic at first BUT amazing after wards.
Thursday, June 9, 2016
New Herb Garden for our Kitchen
Today I wanted to share one of my recent Marshall's shopping finds ;). I just loved the farmhouse appeal. I mean who doesn't love distressed wood & galvanized metal? All I had to do was buy the fresh herbs. I actually wanted my new found planter to not only look super cute but be functional in my kitchen as well... For herbs I decided on Mint and Basil... Now the basil will eventually outgrow this little pot but hopefully the various mints will last.. Summer Mojitos here we come..Yum!
Monday, June 6, 2016
Painted Books for a little girls room
This is a super fun and pretty way to jazz up any old books you may have lying around your house... If you don't have any you can check out either your local thrift store OR ReStore. I've had luck at both stores and found great books for approx. $1 each. And with summer great deals can be found at Garage sales too.. See how with a little paint and stencils these old books look girly and new again.
Saturday, June 4, 2016
Antique Barn Door as our Laundry room door
I am so excited to share what I have been up to lately. I found these amazing doors last summer at a town fair... 3 doors for $80!! We were using 2 of them in our garden last summer and one inside our basement as Wall Decor. Then a few months ago I was inspired by The Lettered Cottage's Door and also a beach house we stayed at recently where they had really cool vintage doors throughout the house (more on that to come!).. Anyways so when we got back from the trip I decided to measure the doors we had hanging around.. and sure enough the 2 of them were a PERFECT MATCH!!
So needless to say I was ecstatic .. Check out this quick and easy change to add vintage charm and character to your home.
Tuesday, May 31, 2016
Adding Wood Planks to our Kitchen Island
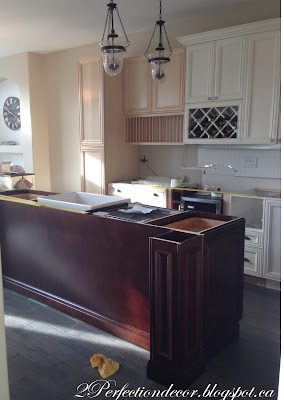
Since i'm on this whole planking kick..Today I thought I'd share just a quick post on how we 'casualized' .. not sure if that's a word?.. Our kitchen island! We had the kitchen island cabinets installed in dark wood BUT it's so NOT ME or our house for that matter.. My hubby wanted to keep it dark originally for a year or so..But I FINALLY convinced him to see my vision and he agreed painting it was the best choice for us.. It was just too darn red to go with our home and floors!! :(
I wanted our island to be a huge centrepiece literally.. so we added faux doors on the side and big 8x10 posts on either side. We made the posts 'staggered' so they looked more like separate posts, more like a piece of furniture if you will!... Originally we were going to add faux doors to the front of the island where the stools are. But I didn't want too formal of a look. I also didn't want to spend all that money on extra 'faux doors'. In order to add detail and 'Casualize' the island for a more relaxed farm house/french country look we decided to add a wide tongue and groove panelling. Check out the full transformation below...
Friday, May 27, 2016
Plank Ship Lap wall
Hi guys.. I'm back!! Back from what you ask.. Well from some hard core sleep deprivation..So much so that we had to hire a sleep doula.. Our 9 month old was going to bed at 10pm with 2 night feeds and refusing to go back to sleep. :( Plus we just started sending our 3 year old to nursery school which has unfortunately been a really hard transition for her and us as a family.. she's super attached to me and gets separation anxiety... so mornings are super eventful over here! And with starting school came germs, so many germs!.. We have had cold after colds over here and more interrupted sleeps.. But as I write this I am hopeful that we are all on the up-hill so now and I can start posting regularly again as I really do enjoy sharing what is happening over here with all of you. Now on to something fun... Last month I shared our sons full Nautical Nursery reveal.. Here is the in-depth look at the transformation of his wooden plank wall. As you may remember I flip flopped on painting his whole bedroom white and finally decided it was easier to just keep the walls BM Edgecomb Grey and brighten the room up by adding ONE white wood Plank Wall as a feature wall.. It really lends to the coastal vibe of his nursery... See the details below..
Saturday, April 9, 2016
Nautical Nursery Reveal
So here it is.. Our little James Nursery.. I tend to naturally gravitate to calming and coastal decor with touches of it throughout our entire home.. so when we found out we were having a boy, I just knew the nursery theme had to be nautical!! click for all the details with full source list below...
Friday, March 11, 2016
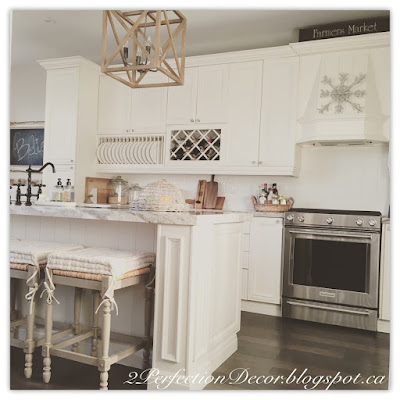
Farmhouse Kitchen Reveal
Wow its been a while.. Not intentionally, just Life has been happening.. Between the 2 kids keeping me busy, trying to work on myself and getting back in shape and oh ya sleeping in between feeds, still at 3 a night :(.. I have no time.. But today NAP time was kind to me.. They both did at the SAME TIME!! This almost never happens, my eldest doesn't always like to nap, so its a nice surprise when she does.. Finally Mommy could post our long awaited Kitchen Reno Reveal! So here you have it.. Our lengthened, more open concept Kitchen with a touch of Farmhouse Flair. See all the details by clicking below...
Friday, February 19, 2016
Deciding on 'Fantasy Brown' Quartzite Granite
Our kitchen reno is officially over.. what a fun and stressful time!! Before I show you the full reveal let me show you some of the progress.. Here is one of the main staples in the design of our kitchen.. The counter top!!
Now that we decided on cabinets came the fun part .. choosing a counter top.. I thought this was going to be a no brainer.. I went into it thinking No more laminates.. maybe butcher block, granite or quartz, would love a marble.. but I'm not that careful in the kitchen plus I have kids.. Then we went and looked at options.. First let me tell you.. warn you if I may.. Never go down the marble aisle!! NEVER!! It will end up in heart ache,, seriously I knew I loved marble before but when you see all the big slabs staring at you its insane how gorgeous it really is! Even my hubby loved it.. But from a practical stand point I just couldn't..I know that when I inevitably stained or scratched it, I would be so mad at myself.. So onto the Granite aisles.. so many to choose from, all I knew is I wanted a light-ish granite like a Carara Marble. Ah hah ha ha sounds so simple right? wrong.. Oh my gosh first off granite isn't just granite..who knew?? Not me! It's granite quartzite, quartzite granite.. all very confusing. The short of it is.. The granite quartzite is more like a marble, softer, more likely to scratch or stain :(.. But not nearly as delicate as a marble.. the colours however broaden our search a ton, with a ton of marble-like options with lighter creamier whiter, grayish bases.. so I had my list of granites to choose from thanks to Pinterest. .. And you know what.. it all went out the window when we walked by this slab 'Fantasy Brown Quartzite'.. now wait the name makes no sense :) It doesn't have any true brown in it.. Bits of ivory, taupe's and greys! It's slightly busy in its movement BUT the colour tones are soothing, right up my alley. and the best part is the hubby and I agreed!! Now this fact is not lost on me.. quite the opposite actually I lost sleep over it.. Me and the hubby agree??.. "No way, there must be a mistake!we need to choose another slab!".. And so we went back again just to be sure.. and sure enough I was in love! The only thing I will say, is you really have to love the stone you pick.. Embrace its natural beauty.. Because in certain lights, for us its natural light.. which we have a ton of.. On a certain angle you can really see the dots inside the stone which makes it look kind of like water marks :( We are calling them 'fleckles' in the stone. Now I am just EMBRACING its natural beauty and not letting it bother me cause I know its all part of it, the stone itself has a ton of character almost like a geode glittery stone.. So if you are looking for a marble alternative this might appeal to you. Obviously our counter is still new but so far we LOVE it! So here it is..
I took the above picture at my local Home Depot that shows all the granite options they carry.. The 'Fantasy Brown' granite is the most whitish granite pictured in the middle right. Below is a picture of our BEFORE counter. It was a faux granite Laminate counter top.
And here it is now :)
We went with a 2 1/2" thickness for the edge.. The slab starts off as 2cm quartzite/granite and then you choose the edge.. I HIGHLY recommend the "Mitered edge"... It creates a seamless flow of the granite down the sides/edge. The company we went with did an incredible job mitring it. It's honestly so hard to even see the seam.
We ended up painting the island..You can see our full kitchen reveal HERE!!
Saturday, February 13, 2016
Lighting for 9ft Kitchen Island
We went back and forth on this one.. should we keep our current hurricane lantern lighting? add pot lights? go with one huge chandelier, go with 2 small chandeliers, or one big pendant??? In the end we went in a completely different direction than we currently had..click for full details ..
Sunday, January 31, 2016
Living Room Plank wood ceiling
I'm going to take a break from the kitchen reno right now and share one of our more recent additions.. So if you read my previous post on on Ensuite shower reveal I mentioned that due to our shower leaking we had to patch up our living room ceiling which of course resulted in me adding another DIY project to the never ending list...the silver lining in all of this leak is that now we get a panelled wood ceiling!!! yay!!
Thursday, January 28, 2016
Kitchen Plans continued...
First let me apologize, I have been crazy busy with this kitchen Reno.. it has taken over our life!!.. Don't get me wrong..Its so FUN and surreal to see my vision come to life but at times ultra stressful to plan and execute..
First off the mess alone and the kids which leads to us leaving our home for a week.. packing up with 2 kids under 3 is a MISSION in itself!!
So because we didn't have a project manager .. it all came down on moi but the kids needed me too, so my hubby was the site supervisor while I was available through FaceTime and by phone.
So lets start with how it all began.. as I said before in my previous post, we were keeping our current cabinets just extending them approximately 4FT, adding a island and therefore changing the flooring.. It sounded easy enough at first.. Then came the tough part.. finding matching cabinets.. WOW.. this in itself took weeks.. I went to a custom Kitchen company who refused the job saying they didn't like to MIX the cabinets with other brands?? so weird so they didn't want my money.. ODD !! then I called a few local private carpenters which resulted in nothing so finally after searching online I found a local company that made almost the same style cabinet as ours.. I booked and appointment and met with a kitchen designer, I told him all my dreams and later that week he called to burst the bubble I was living in ;).. Well it wasn't outrageous just much more than I had anticipated. The unfortunate part was the door style that matched (or basically matched) ours was a up there in upgrades 6th out of 8.. so needless to say more money. We opted to just do the MATCHING extension of the kitchen cabinets and go with another company all together for the island. The island was a separate entity, plus I don't like matchy matchy anyways. The other main reason for going with another company for our island is that we were able to get much better quality doors..solid wood! With solid wood drawers, all with included soft close.. unlike our new cabinets that matched our existing.. I had to pay $400 for to get 4 soft closing drawers!!
Clearly the cabinets don't match ours in colour.. They are Natural Maple.. soon they will be professionally sprayed and painted Benjamin Moore Linen White 912. The way to keep the look completely cohesive is to keep the hardware the same as our previous kitchen cabinets. Luckily I was still able to find the matching hardware. The pulls above are from Lowes.
Now that we decided on cabinets came the fun part .. choosing a counter top.. butcher block, laminate, concrete, marble, quartz, granite .. so many counter top choices out there!
We wanted to get away from another laminate counter top.. First let me say when you chose to go counter top shopping.. AVOID THE MARBLE SECTION!!! Oh my gosh I was in love, it was absolutely heartbreaking, I see why so many people choose it!! Its heaven! Honestly I wish I were more careful in the kitchen cause I wanted it so bad!! Quartz was nice, I liked that I could get more of the white marble-y look I craved BUT it did look fake to me personally and the cost was HUGE! I couldn't wrap my head around spending that kind of money and not loving it.. After going back and forth we decided on a 'Quartzite granite'.. in the end we chose 'Fantasy Brown Quartzite' a mix between a granite and marble with lots of ivory and whites. The best of both worlds if you ask me.. It has the look of marble with its swirled marble effect and not dotty like most granites. The white colour in the stone is what I loved though it does allow for it to be more porous and scratch easier but not nearly as easy as a marble. Hopefully it holds up.. So here is the slabs we chose..
Fantasy Brown Quartzite - Creamy with taupe's and greys and browns with a touch of sage green. Love! Love! Love! The best part is the hubby and I agreed!!!
So here is a sneak peek of our kitchen Reno progress.. You will have to use your imagination as the lighting still needs to moved, cabinets painted, (still fighting on getting the Island painted!) walls painted, counters installed.. the list goes on and on BUT we are at least in the home stretch now.. I just really need a counter so I can have a working sink and dishwasher.. washing dishes and bottles in the Laundry room is NO FUN!! :(
Does anyone have any helpful tips for surviving a Kitchen Reno? I'd love to hear them.
Have a Great Weekend!
Subscribe to:
Posts (Atom)
